
BLOG
Step-by-Step Guide for Building a Panoramic Padel Court
Recent Articles
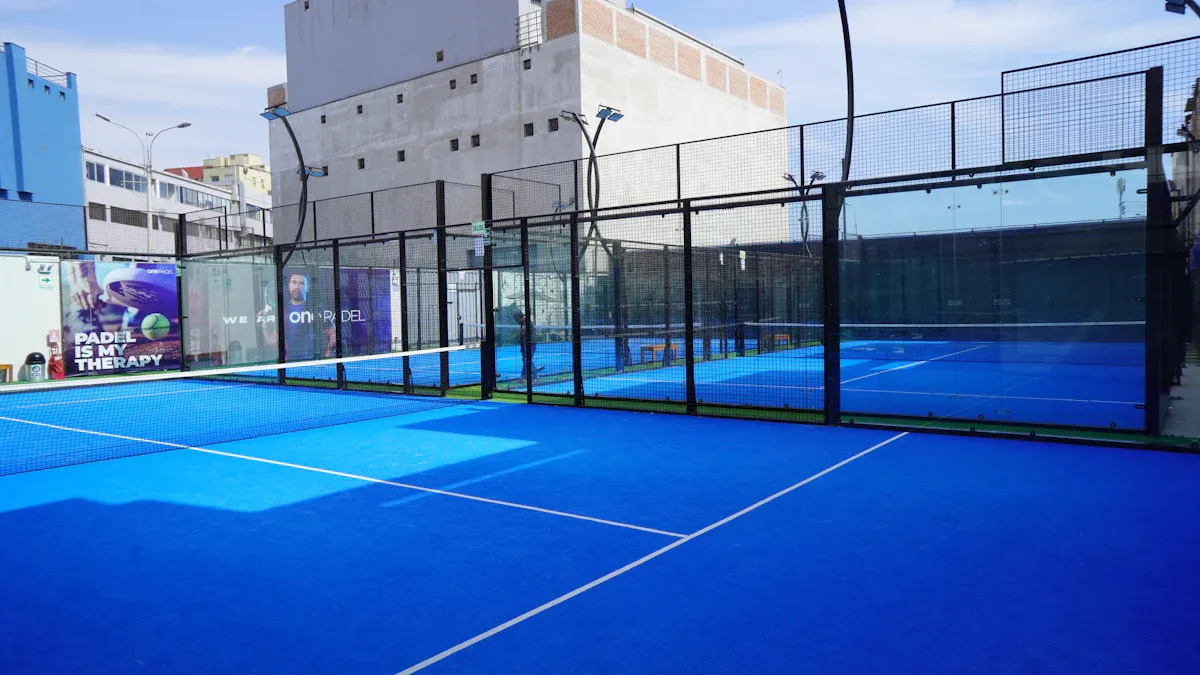
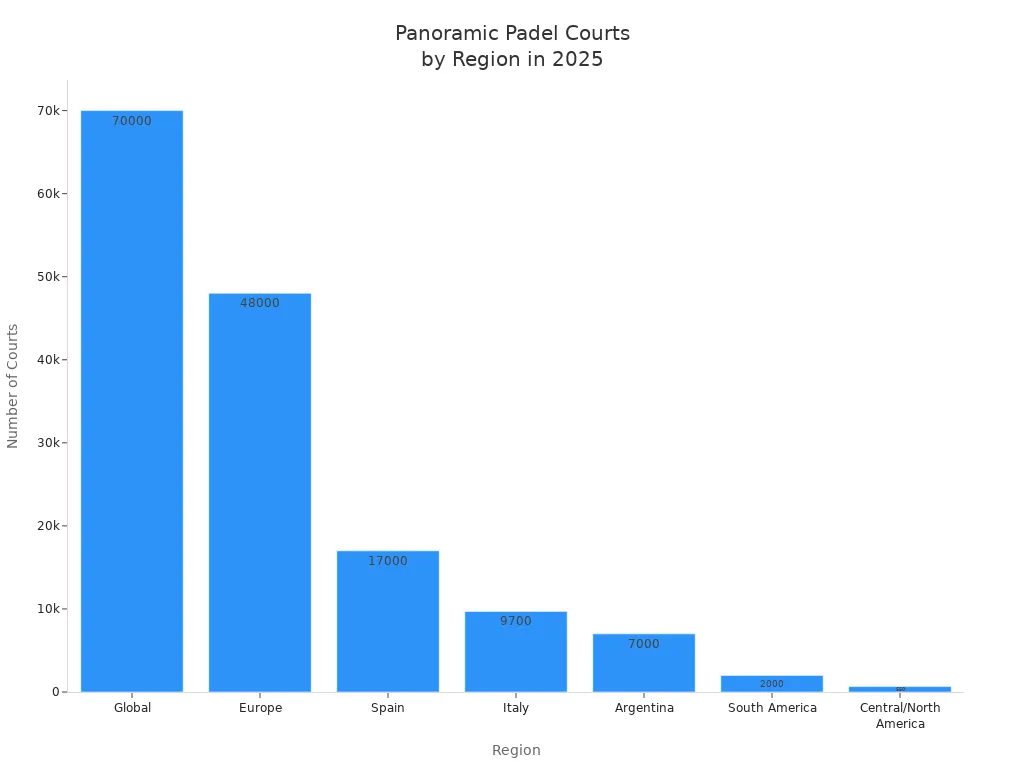
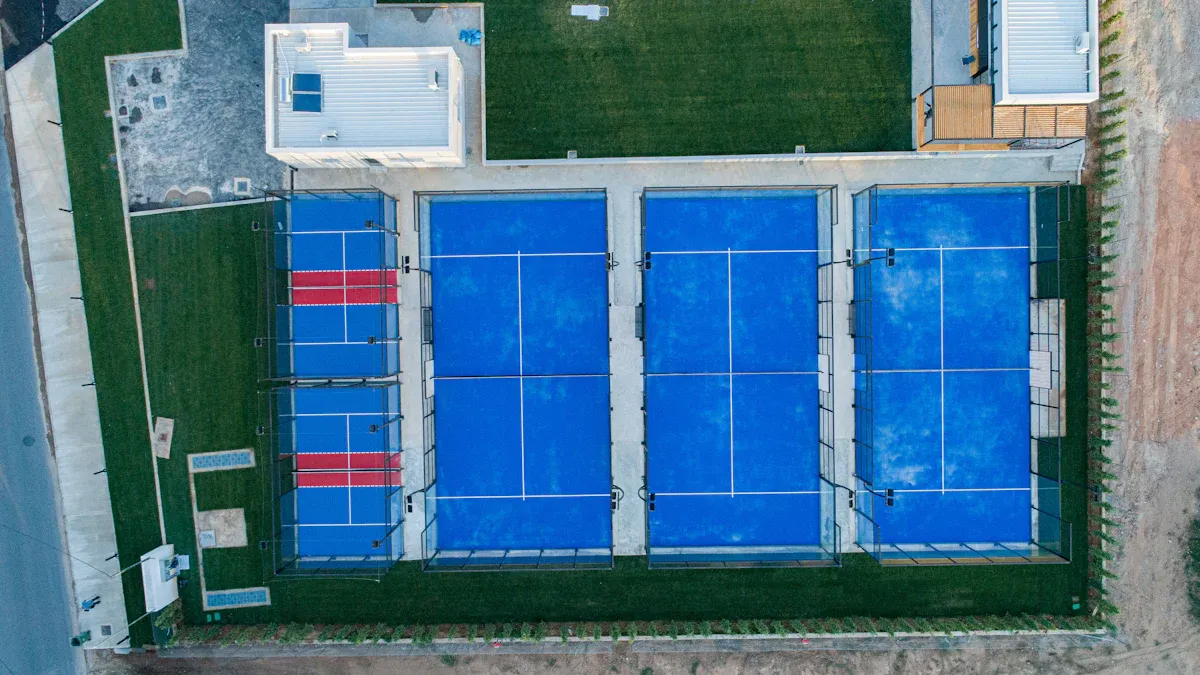
You can build a panoramic padel court by following a clear process—selecting the right site, using top-tier materials, and assembling each part with care. The RR01 stands out for its innovative design, featuring connectors instead of corner posts for a wide-open view and durable steel and plexiglass construction. These courts are booming worldwide, with over 70,000 courts in more than 150 countries.
| Region | Number of Courts | Growth Rate (%) | Year |
|---|---|---|---|
| Global | 70,000 | N/A | 2025 |
| Europe | 48,000 | 170 | 2025 |
| Spain | 17,000 | N/A | 2025 |
| Italy | 9,700 | N/A | 2025 |
| Argentina | 7,000 | N/A | 2025 |
| South America | >2,000 (Chile, Paraguay) | N/A | 2025 |
| Central/North America | 650 | N/A | 2025 |
Tip: Whether you’re a passionate player or a facility manager, you’ll find this guide practical and easy to use.
Table of Contents
Key Takeaways
- Choose the right location for your padel court. Ensure it is level, well-drained, and has enough space for safe movement.
- Understand the standard dimensions for a padel court. A full-size court measures 20m x 10m, with specific height requirements for walls.
- Select high-quality materials. Use galvanized steel for durability, tempered glass for safety, and artificial turf for consistent play.
- Plan your budget carefully. Costs can range from €17,500 to €91,200 based on materials and features. Include a contingency fund for unexpected expenses.
- Follow local regulations. Obtain necessary permits and ensure your court meets zoning and safety standards.
- Prioritize proper installation. Use modular systems like the RR01 for easier assembly and ensure all components are securely fitted.
- Implement regular maintenance. Clean the court, check the glass for damage, and maintain the turf to ensure a safe playing environment.
- Invest in good lighting. Use LED fixtures for energy efficiency and proper visibility during night play.
Planning & Site Selection
Space Requirements
Court Dimensions
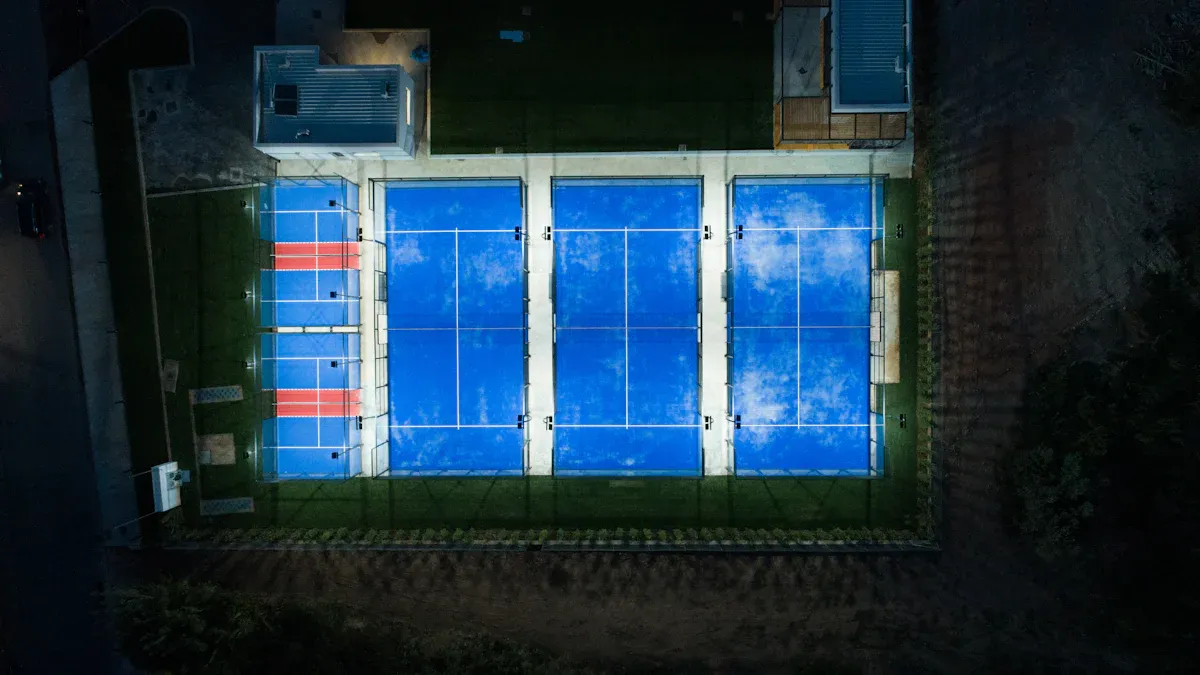
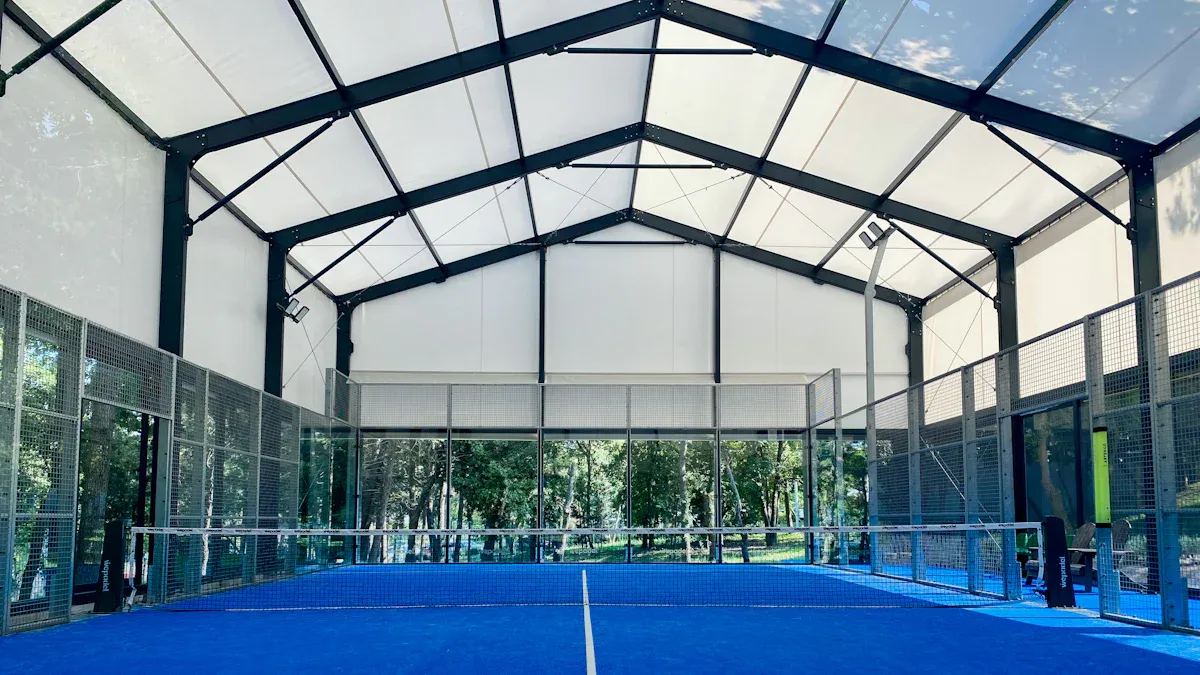
When you start planning, you need to know the exact space your court will take. The standard for a modern court is 20 meters long and 10 meters wide. This size gives players enough room for fast-paced rallies and safe movement. If you want a single court, you can go with 20 meters by 6 meters, but most facilities choose the full size for the best experience. You also need to think about the height. The back wall should be 4 meters, and the side walls should be 3 meters. If you build indoors, make sure the ceiling is at least 8 meters high.
| Requirement | Measurement |
|---|---|
| Standard court dimensions | 20m x 10m |
| Single court dimensions | 20m x 6m |
| Height of back wall | 4 meters |
| Height of side walls | 3 meters |
| Recommended indoor height | At least 8 meters |
| Concrete slab dimensions | At least 20.5m x 10.5m |
| Recommended spacing between courts | At least 1.5 meters |
Access & Orientation
You want your court to be easy to reach and comfortable to use. Pick a spot that is level and drains well after rain. Make sure there is enough space around the court for players to move safely. If you plan to have more than one court, leave at least 1.5 meters between them. Good lighting is important, so consider adding LED spotlights for evening games. Try to place your court in a central location with parking nearby. If you live in a windy or rainy area, you might want to build your court indoors.
Permits & Approvals
Local Codes
Before you start building, check the rules in your area. Most places require you to get permits from local authorities. You may need to show that your land is zoned for sports or recreation. If your court is near homes, you might have to install soundproof fencing or set limits on when people can play.
| Requirement | Description |
|---|---|
| Land Use Zoning | Make sure the land is zoned for sports or similar activities. |
| Noise Considerations | Use soundproof fencing and set hours if the court is near homes. |
Environmental Factors
Think about the weather and the environment. If your area gets a lot of rain, choose a site that drains well. In windy places, indoor courts work better. Always check if you need extra permits for things like lighting or fencing.
Note: Permit requirements can change a lot depending on where you live. Always talk to your local authorities before you start building.
Budget & Timeline
Cost Factors
Building a court is a big investment. Costs can range from €17,500 to €91,200, depending on the materials, location, and extras you choose. Here’s a quick look at what you might spend:
| Component | Cost Range (EUR) |
|---|---|
| Foundation | €0 – €35,000 |
| Steel and Glass Structure | €16,500 – €35,000 |
| Artificial Turf | €1,000 – €5,000 |
| Lighting (optional) | €1,800 – €8,000 |
| Additional Equipment | €1,600 – €8,200 |
| Total Cost Range | €17,500 – €91,200 |
Scheduling
Plan your timeline carefully. The process includes site prep, permits, delivery of materials, and installation. Delays can happen, especially if you wait for permits or materials. Make a schedule and stick to it as much as possible. This helps you avoid surprises and keeps your project on track.
Tip: Careful planning and budgeting make the building process smoother and help you get the most out of your new court.
Panoramic Padel Court Materials
When you build a court, the materials you choose make all the difference. Let’s break down the main components so you know what to look for and how each part affects your court’s quality and performance.
Steel Structure
Galvanized Steel Posts
You want your court to last for years, so start with strong steel posts. Most high-quality courts use Q235B steel square tubes. For example, the RR01 model uses 100x100x3 mm posts for the main pillars and 100x50x3 mm for mesh pillars. These posts give your court the strength it needs to handle tough weather and heavy use.
| Component | Specification |
|---|---|
| Pillar | Q235B steel square tube |
| Light Pillars | 4 pcs, 100x100x3 mm |
| Mesh Pillars | 8 pcs, 100x50x3 mm |
| Frame | Q235B steel square tube 30x50x3 mm |
| Mesh | 46 pcs, diameter 4 mm, 50×50 mm |
Concept: Why Galvanized Steel?
Galvanized steel resists rust and corrosion. This means your court will stay safe and sturdy, even if you live in a rainy or humid area.
Coating & Durability
You don’t just want strong steel—you want it to look good and last. That’s where coatings come in. Most courts use a zinc coating for corrosion resistance and an electrostatic powder coating for color and extra protection. The RR01 offers custom color options, so you can match your court to your club’s branding or your personal style.
- Zinc coating keeps the steel from rusting.
- Powder coating adds color and a smooth finish.
Comparison: Powder Coating vs. Paint
Powder coating lasts longer and resists chipping better than regular paint. If you want a court that looks great for years, powder coating is the way to go.
Glass Panels
Thickness & Safety
Safety is key when you’re dealing with glass. Top courts use 12 mm thick tempered glass. This thickness gives you superior strength and can handle impacts from all angles. The glass meets strict safety standards like EN 1096, ISO 12543, and CE marking, so you know it’s safe for players and spectators.
| Feature | Specification |
|---|---|
| Glass Thickness | 12 mm tempered glass |
| Wind Resistance | Up to 120 km/h |
| Coating | QUALICOAT® polyester |
Concept: Tempered Glass vs. Regular Glass
Tempered glass is much stronger than regular glass. If it breaks, it shatters into small, blunt pieces instead of sharp shards, making it much safer.
Panel Size
Standard glass panels for courts measure 2 meters wide by 3 meters high. This size gives you clear views and a modern look. The RR01 uses 18 panels of this size, which creates a seamless, panoramic effect.
| Specification | Details |
|---|---|
| Recommended Thickness | 12mm toughened glass |
| Standard Width | 2 meters |
| Standard Height | 3 meters |
Comparison: Large Panels vs. Small Panels
Large panels mean fewer joints and a cleaner look. They also make the court feel more open and inviting.
Artificial Grass
Turf Quality
The turf you choose affects how the game feels. Look for artificial grass with a height between 11-14 mm. Monofilament fibers give you better durability and performance. The RR01 uses high-density turf that meets international standards, so you get great ball bounce and player comfort.
| Quality Indicator | Description | Effect on Gameplay |
|---|---|---|
| Height of Turf | 11-14 mm | Ball speed and player comfort |
| Fiber Density | Monofilament fibers for durability | Performance and durability |
| Sand Infill | 16-19 kg/m² of graded silica sand | Ball bounce and player movement |
Concept: Turf Height and Ball Speed
Shorter turf makes the ball move faster. Taller turf slows it down and adds comfort. Choose the height that matches your playing style.
Installation Area
You need about 200 square meters of artificial grass for a standard court. Make sure the turf covers the whole playing area for a smooth, even surface.
Comparison: Artificial Grass vs. Natural Grass
Artificial grass needs less maintenance and stays consistent all year. Natural grass can get muddy or uneven, which affects play.
Tip: Customization matters! With the RR01, you can pick your turf color and even add your logo for a unique look.
Mesh & Accessories
Steel Mesh
Steel mesh forms the backbone of your court’s side walls. You want mesh that’s strong, rust-resistant, and safe for players. Most top courts use galvanized steel mesh with a 50×50 mm grid and a 4 mm wire diameter. This design keeps the ball in play and stands up to hard hits. The RR01 model includes high-quality mesh that’s welded for extra strength and coated for weather protection. You can choose the mesh color to match your court’s style or branding.
Tip: Welded mesh panels stay tight and don’t sag over time. That means less maintenance for you.
Net & Posts
The net is where the action happens. You need a sturdy net that stays tight and sits at the right height—88 cm in the center and 92 cm at the posts. Look for posts made from galvanized steel, just like the main structure. These posts resist rust and keep the net stable, even during intense matches. The RR01 includes high-strength net posts and a professional-grade net, so you get a reliable setup from day one.
| Accessory | Feature | Benefit |
|---|---|---|
| Steel Mesh | 50×50 mm grid, 4 mm wire | Ball containment, safety |
| Net | Professional-grade, 88-92 cm high | Consistent play |
| Net Posts | Galvanized steel, powder coated | Durability, stability |
Lighting
LED Options
Lighting makes a huge difference, especially if you want to play at night. Modern courts use LED lights because they’re bright, energy-efficient, and last a long time. The RR01 comes with eight high-quality LED fixtures, which is perfect for a standard court. You’ll want LEDs with a color temperature between 4000K and 6000K for clear, natural light. Look for a Color Rendering Index (CRI) above 70, so colors look true and the ball is easy to see.
- LEDs save energy and cut down on maintenance.
- You get even light with no dark spots.
- Choose the right color temperature for the best visibility.
Placement
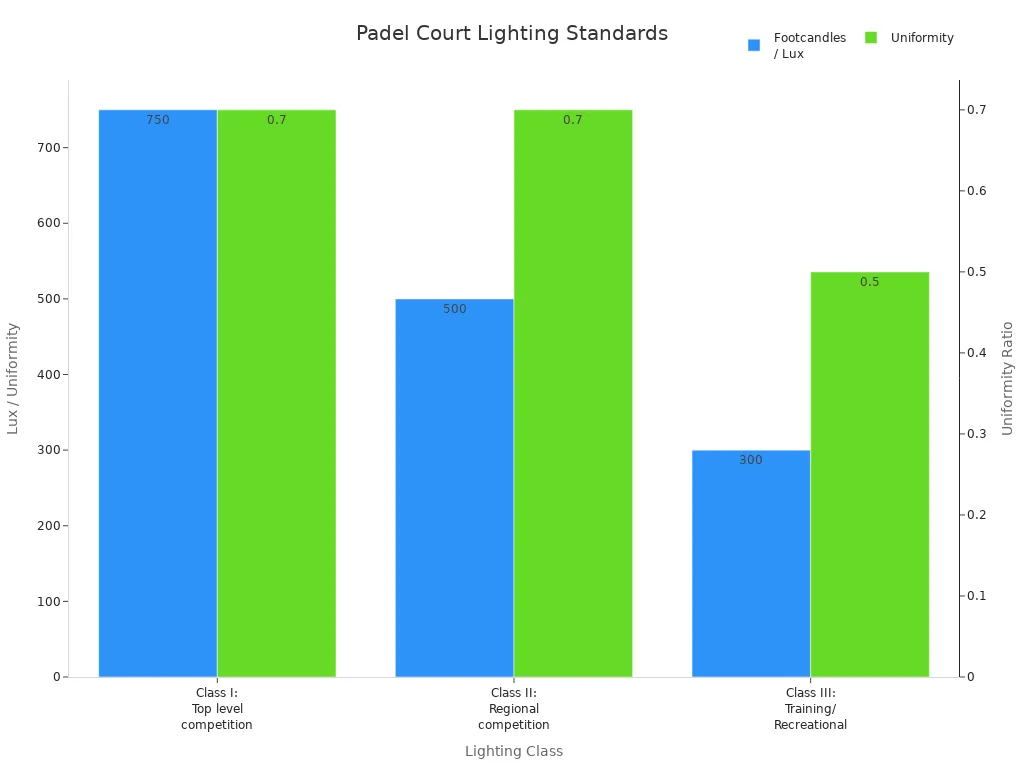
Where you put your lights matters as much as the type you choose. Place four LED lights on each long side of the court, mounted on poles at least 6 meters high. This setup gives you even coverage and reduces shadows. For recreational play, aim for at least 300 lux of horizontal illumination. If you want to host tournaments, you’ll need 500 to 750 lux and a uniformity ratio of at least 0.7. The RR01’s lighting package meets these standards, so you’re ready for any level of play.
| Lighting Class | Lux (Illuminance) | Uniformity Ratio |
|---|---|---|
| Top Competition | 750 | 0.7 |
| Regional Competition | 500 | 0.7 |
| Training/Recreational | 300 | 0.5 |
Note: Good lighting helps players see the ball clearly and keeps the game safe. Always check your local standards before installing lights.
Site Prep & Foundation
Getting your court off to a strong start means paying close attention to the ground beneath it. You want a surface that stays level, drains well, and supports the structure for years. Let’s break down the steps you’ll need to follow.
Clearing & Leveling
Before you build anything, you need a clean, flat area. Remove rocks, roots, and debris. Level the ground so water doesn’t pool after rain. This step helps you avoid future problems like cracks or uneven turf.
Soil Testing
Soil testing is a must. You want to know if the ground can support a heavy concrete slab. Start with a site survey. Check the soil type, map the elevation, and see how water moves across the area. If the soil is soft or holds water, you may need to dig deeper or add a stronger base.
- Test the soil for stability.
- Map out the elevation and water runoff.
- Compact the soil for a solid base.
Drainage
Good drainage keeps your court dry and safe. Install a multi-layered drainage system. Use permeable materials for the sub-base, like crushed stone, to let water flow through. Add a geotextile membrane to stop soil from mixing with the base. Place perimeter drains around the court to move water away fast.
- Use a compacted, permeable sub-base.
- Lay a geotextile membrane.
- Install perimeter drains for extra protection.
Tip: Proper drainage means less maintenance and a longer-lasting court.
Foundation Work
A strong foundation is the backbone of your court. You want a slab that won’t crack or shift over time.
Concrete Slab
The slab should be thick and sturdy. Most experts recommend a thickness of 18 to 20 cm (about 7 to 8 inches). Underneath, use a 250 mm sub-base and a 65 mm layer of porous material for drainage.
| Specification | Details |
|---|---|
| Slab Thickness | 18–20 cm (7–8 inches) |
| Sub-base Depth | 250 mm |
| Porous Material Layer | 65 mm |
You can choose smooth concrete, porous concrete, or even asphalt for the interior, depending on your needs.
Reinforcement
Reinforce the slab with steel bars. This step adds strength and helps prevent cracks. Use reinforced concrete for the perimeter to keep everything locked in place.
- Add steel bars for extra support.
- Reinforce the edges for stability.
Note: Reinforcement is key for long-term durability.
Layout Marking
Now, mark out the exact court layout. This step ensures everything fits perfectly.
Anchor Points
Mark where you’ll place the posts and glass panels. Accurate anchor points keep the structure stable and safe.
- Double-check all anchor locations.
- Use stakes or chalk lines for guidance.
Measurements
Measure everything twice. Make sure the court is square and matches the official dimensions. Small mistakes here can cause big problems later.
- Confirm all measurements before pouring concrete.
- Check distances between anchor points.
Callout: Careful prep now saves you time and money later. Take your time with these steps for the best results.
Panoramic Padel Court Installation
Frame Assembly
Alignment
You want your court to look sharp and play true. Start by checking that your concrete foundation is flat and smooth. Grab a level instrument and make sure every spot lines up. Mark straight lines on the ground for each column. This step keeps your court square and prevents future headaches.
Tip: Double-check your lines before you start. A small mistake here can throw off the whole build.
Securing Posts
Now you’re ready to set the steel posts. Open one package at a time so you don’t mix up parts. Fix the corner columns first. These set the shape for the rest of the court. Next, install the upper and lower glass beams and the metal frame. Use wrenches and measuring tape to get everything tight and in the right spot. Secure each post to its anchor point. Make sure every post stands straight and firm. If you’re working with the RR01 system, you’ll notice how the modular design makes this step easier and faster.
Callout: Strong posts mean a safe and sturdy court. Take your time and check each connection.
Glass Panel Installation
Handling Safety
Glass panels give your court that panoramic look, but you need to handle them with care. Use professional vacuum suction cups to move each panel. This keeps the glass from slipping and protects your hands. Place anti-collision rubber strips around the glass before you set it near the steel columns. These strips prevent chips and cracks during installation.
| Step | Safety Protocols |
|---|---|
| 1 | Use vacuum suction cups for safe handling. |
| 2 | Add anti-collision rubber strips to glass edges. |
| 3 | Install panels from the corners, securing with rubber gaskets and metal clips. |
| 4 | Check verticality and parallelism for uniform gaps. |
| 5 | Align all panels for a flat wall and smooth ball bounce. |
| 6 | Tap glass to confirm it’s secure and clean off dust. |
Note: Always wear gloves and safety glasses when working with glass.
Sealing
Once you’ve set the glass panels, seal the joints with EVA rubber strips. These strips cushion the glass and keep water out. Secure each panel with metal clips and rubber gaskets. Check every joint for tightness. A good seal keeps your court safe and looking sharp. After you finish, clean the glass so players and spectators get a clear view.
Mesh & Accessories
Mesh Tensioning
Steel mesh keeps the ball in play and adds safety. Start by making sure the court surface is clean and flat. Gather your tools—wrenches and measuring tape work best. Install the mesh frame columns, then attach the mesh panels. Pull each panel tight so it doesn’t sag. Welded mesh panels, like those in the RR01, stay firm and need less maintenance.
Tip: Tight mesh means fewer repairs and a better game.
Net Setup
The net is the heart of the action. Position the net posts 10 meters apart. Secure them so they don’t wobble. Tie one end of the net to a post, stretch it across, and fix the other end. Adjust the tension so the net sits at the right height—88 cm in the center and 92 cm at the posts. Fix the top cable and tie the bottom edges to the turf. Measure everything to make sure it matches official standards. Regularly check the net for wear and re-tension as needed.
Callout: A well-set net gives you consistent play and keeps matches fair.
Concept: Modular Installation vs. Traditional Build
Modular systems, like the RR01, let you assemble your court faster and with fewer tools. Traditional builds take longer and need more manual adjustments. If you want a quick, reliable setup, modular is the way to go.
Concept: Safety First
Always put safety at the top of your list. Use the right tools and protective gear. Handle glass and steel with care. A safe installation means years of worry-free play.
Concept: Mesh Quality
High-quality mesh panels last longer and need less fixing. Welded mesh resists sagging and stands up to hard hits. Choose mesh that matches your court’s needs.
Comparison: Welded mesh vs. chain-link mesh—welded mesh offers better durability and a cleaner look.
Concept: Net Tension
Proper net tension keeps the game fair. Loose nets sag and mess up play. Tight nets stay in place and give you a true bounce.
Tip: Check net tension before every match for the best results.
You’re now ready to move on to turf laying and lighting setup. Each step builds on the last, so keep your focus and enjoy the process.
Turf Laying
Getting the turf right is essential for a smooth, safe, and enjoyable playing surface. You want your court to look professional and play perfectly, so let’s break down the process step by step.
Base Layer
A strong base layer supports your turf and keeps it level for years. Here’s how you can build a solid foundation:
- Strip away any existing soil or grass.
- Add a backfill layer using sand or crushed stone. This helps with drainage and stability.
- Lay down a geo-textile fabric. This stops weeds and keeps the layers from mixing.
- Build up a load-bearing layer with more crushed stone. Compact it well.
- Pour reinforced concrete around the perimeter. This locks everything in place.
- Add a finer layer of crushed stone or draining asphalt on top. This creates a smooth, even surface for the turf.
Tip: Always check for proper drainage. Water should move away from the court quickly to prevent puddles and turf damage.
Turf Fixing
Now you’re ready to install the artificial grass. Even the best turf won’t perform well if you skip steps or rush the process. Here’s what you should do:
- Roll out the turf across the entire playing area. Make sure the seams line up and the fibers face the same direction.
- Cut the turf to fit the court’s shape, trimming around posts and corners.
- Use strong adhesive or turf nails to secure the edges and seams. This keeps the turf from shifting during play.
- Add a draining and anti-shock underfelt beneath the turf for extra comfort and safety.
- Spread silica sand infill evenly over the turf. Brush it in so the fibers stand upright and the surface stays firm.
Note: Professional installation following the manufacturer’s instructions will help your turf last longer and play better. If you skip steps or use the wrong materials, you might void your warranty.
Concept: Artificial Turf vs. Natural Grass
Artificial turf gives you a consistent bounce and needs less maintenance than natural grass. You won’t have to worry about mud, uneven patches, or mowing.
Comparison Table: Turf Installation Steps
| Step | Purpose | Result |
|---|---|---|
| Base layer preparation | Stability and drainage | Even, dry surface |
| Turf fixing and infill | Secure, safe playing area | Consistent gameplay |
Lighting Setup
Proper lighting lets you play any time, day or night. It also keeps the court safe and makes every match more enjoyable.
Pole Placement
You want your lights to cover the whole court without blinding players. Here’s how to set up your lighting poles:
- Place poles just outside the corners of the court. This keeps them out of the way and gives you wide, even coverage.
- Use poles that are 6 to 8 meters tall. This height balances brightness and reduces shadows.
- Choose LED fixtures with asymmetric optics. These direct the light onto the court and cut down on glare.
Tip: Anti-glare LED lights help players see the ball clearly and keep the game fair.
Electrical Safety
Safety comes first when working with electricity. Always follow these steps:
- Hire a licensed electrician to handle all wiring and connections.
- Use waterproof cables and fixtures rated for outdoor use.
- Install circuit breakers and surge protectors to guard against power spikes.
- Test all lights before play begins to make sure everything works as it should.
Callout: Never cut corners with electrical work. Safe installation protects players and extends the life of your lighting system.
Concept: LED Lighting vs. Traditional Lighting
LED lights use less energy and last much longer than old-style bulbs. They also give you brighter, more even light with less maintenance.
Quick Checklist for Lighting Setup
- Poles placed outside court corners
- 6–8 meter pole height
- LED fixtures with anti-glare features
- All wiring done by a professional
With your turf and lighting in place, your court is almost ready for action. Take your time with these steps, and you’ll enjoy a beautiful, safe, and professional playing environment.
Inspection & Safety

After you finish building your court, you need to check every detail to make sure it’s safe and ready for play. Careful inspection helps you catch small issues before they become big problems. Let’s walk through the main steps.
Structure Check
Glass Security
You want the glass panels to stay strong and safe. Start by checking each panel for chips or cracks. Make sure every panel sits tight in its frame and that rubber gaskets cushion the edges. Tap the glass gently to confirm it’s secure. If you hear rattling, tighten the clips or brackets. Certified glass, like 12 mm tempered panels, should have safety markings such as CE or TÜV SÜD. These show the panels meet strict standards for impact and durability.
Frame Stability
A sturdy frame keeps your court standing tall for years. Walk around and look for any loose bolts or wobbly posts. Use a wrench to tighten connections if needed. The steel structure should feel solid with no movement. Check for rust or damage on the coating. If you see any, touch up the paint or powder coating right away. Courts built with reinforced concrete foundations and installed by certified technicians usually pass this test with flying colors.
Tip: Regular checks help you spot issues early and keep your court safe for everyone.
Surface Testing
Ball Response
A good court gives you a true bounce every time. Drop a ball from shoulder height in different spots. Watch how it bounces. The ball should react the same way across the whole surface. If you notice dead spots or uneven bounce, check the turf and base layer for dips or soft patches. Consistent ball response means your court meets international play standards.
Turf Safety
Player safety starts with the turf. Walk the court and feel for loose seams or raised edges. Tug gently at the turf to make sure it’s fixed tight. Check the sand infill—spread should be even, with no bare patches. A flat, secure surface helps prevent slips and injuries. Synthetic turf, resin, or concrete all work, but the surface must be level and smooth.
Regulation Compliance
International Standards
You want your court to meet the rules for competitive play. Here’s what to check:
- Court size: 20 meters long and 10 meters wide, with a 0.5-meter tolerance.
- Back walls: 3 meters high, side walls taper from 3 to 2 meters.
- Net: 10 meters long, 88 cm high at the center.
- Lighting: Use LED fixtures with the right brightness for tournaments.
- Materials: Surfaces must be flat and even, using approved turf or concrete.
- Certifications: Look for FIP, CE, or TÜV SÜD marks on components.
| Feature | Standard Requirement |
|---|---|
| Court Size | 20m x 10m |
| Back Wall Height | 3m |
| Net Height | 88cm (center) |
| Lighting | LED, 300–750 lux |
Note: Courts that meet these standards can host top-level events like the World Padel Tour.
By following these steps, you make sure your court is safe, fair, and ready for action.
Challenges & Solutions

Glass Handling
Handling glass panels is one of the trickiest parts of building a court. You work with large, heavy sheets that need careful movement and precise placement. If you rush or use the wrong tools, you risk cracks or breakage. You want to use vacuum suction cups and always wear gloves and safety glasses. Place anti-collision rubber strips on the edges before you lift the panels. This simple step protects the glass and keeps your installation smooth.
Tip: Always check the alignment with ear plates before you secure the glass. Misalignment can cause stress points and lead to breakage later.
Concept: Safety First with Glass
Glass panels add beauty and visibility, but they demand respect. Take your time and use the right equipment for every step.
| Issue | Precaution |
|---|---|
| Glass breakage from poor handling or misalignment | Use suction cups, rubber strips, and double-check alignment before installation |
Uneven Ground
You might face uneven ground when you start your project. If the base isn’t level, you’ll run into problems like settling, tilting, or cracks. A strong foundation is the key to a stable court. You need to excavate and level the site, sometimes adding extra fill or removing soft soil. This step can add costs and stretch your timeline, but it’s worth it for long-term stability.
- The foundation supports the whole structure.
- A bad base leads to big problems down the road.
- Leveling and excavation may increase costs and take more time.
Concept: Foundation Matters
A well-prepared base keeps your court safe and smooth for years. Don’t skip soil testing or drainage planning.
| Issue | Precaution |
|---|---|
| Poor foundation (shallow depth, weak concrete) | Align anchor bolts, reserve electrical conduits, and check load-bearing specs |
Weather Delays
Weather can throw off your schedule. Rain, wind, or extreme temperatures slow down construction and affect materials. You want to plan for these delays by choosing weather-resistant materials like galvanized steel and UV-stabilized turf. Some builders use retractable roof systems to keep the court usable year-round. Budget planning helps too. Set aside a contingency fund so you can handle extra costs from weather or material price changes.
- Weather-resistant materials help you play all year.
- UV-stabilized turf and anti-corrosion coatings last longer.
- Retractable roofs add durability and reduce maintenance.
Note: Flexible planning and smart material choices keep your project on track, even when the weather doesn’t cooperate.
Concept: Adaptability in Construction
Choosing the right materials and planning for delays makes your court more reliable and easier to maintain.
| Solution | Benefit |
|---|---|
| Weather-resistant materials | Year-round play and less maintenance |
| Contingency budget | Flexibility for unexpected costs |
You can overcome these challenges with careful planning, the right tools, and a flexible mindset. Each step you take brings you closer to a court that’s safe, durable, and ready for action.
Material Sourcing
Getting the right materials for your court can feel like a puzzle. You want everything to arrive on time and meet your standards. Sometimes, you run into delays or find that suppliers don’t have what you need. Let’s talk about how you can handle these challenges and keep your project moving.
Concept: Supplier Selection
Pick suppliers who specialize in sports construction. They know what works best for your court. Ask for certifications and check reviews. Reliable suppliers help you avoid headaches later.
Comparison Table: Local vs. International Suppliers
| Feature | Local Supplier | International Supplier |
|---|---|---|
| Delivery Speed | Usually faster | May take longer |
| Cost | Can be higher | Sometimes lower |
| Custom Options | Limited | More choices |
| Support | Easier to contact | May have time zone issues |
If you want custom colors or branded accessories, international suppliers often offer more options. Local suppliers can deliver faster and help with urgent needs.
Concept: Bulk Ordering
Order all your materials at once. This saves money and reduces shipping delays. You get everything you need in one go, and you can check quality before installation starts.
Tip: Always ask for a sample before placing a big order. Samples let you see and feel the material so you know it matches your expectations.
Concept: Quality Assurance
Check every shipment when it arrives. Look for damage, missing parts, or wrong sizes. If you spot a problem, contact your supplier right away. Keeping a checklist helps you stay organized.
Common Sourcing Challenges
- Delivery delays from overseas suppliers
- Out-of-stock items during peak seasons
- Price changes due to market demand
- Language barriers with international vendors
How You Can Solve These Issues
- Build relationships with trusted suppliers. They will prioritize your orders.
- Plan ahead and order early, especially for custom items.
- Keep backup suppliers in mind for emergencies.
- Use clear contracts that list delivery dates and quality standards.
Note: If you choose a complete package like the RR01, you get all the main components together. This makes sourcing easier and helps you avoid missing parts.
Concept: Sustainability in Sourcing
Ask suppliers about eco-friendly options. Some offer recycled steel or turf made from sustainable materials. Choosing green products can lower your environmental impact.
Quick Checklist for Material Sourcing
- Confirm supplier certifications
- Request samples
- Order in bulk
- Check shipments on arrival
- Keep backup suppliers ready
You can overcome sourcing challenges with smart planning and good communication. When you stay organized, your court project runs smoother and you get the quality you expect.
Maintenance Tips
Cleaning
Keeping your court clean is the first step to a great playing experience. Dirt, leaves, and dust can build up fast, especially if your court sits outdoors. You want to remove debris every few days. Use a soft broom or a leaf blower to clear the surface. For a deeper clean, wash the court with a mild detergent and water. Avoid harsh chemicals that might damage the turf or glass.
Tip: Regular cleaning keeps the surface safe and prevents slips during play.
Quick Cleaning Checklist:
- Sweep or blow away leaves and dirt
- Wash the surface with mild soap and water
- Rinse thoroughly to remove any residue
- Dry with a soft mop or let air dry
Routine cleaning not only keeps your court looking sharp but also helps you spot small issues before they become big problems.
Glass Care
The glass walls give your court its signature look and open feel. To keep them crystal clear, you need to clean and inspect them often. Start by dusting the panels with a microfiber cloth. Next, spray a glass-safe cleaning solution and wipe down the surface. Use a squeegee for a streak-free finish. Always check for chips, cracks, or loose fittings during your cleaning routine.
Note: Never use abrasive pads or strong chemicals on the glass. These can scratch or weaken the panels.
Best Practices for Glass Maintenance:
- Inspect glass panels for chips, cracks, or loose fittings
- Clean with a soft microfiber cloth and glass-safe cleaner
- Wipe down and squeegee for a clear view
- Tighten any loose brackets or fittings right away
Seasonal changes can affect the glass, so plan for extra checks after storms or extreme weather.
Turf Upkeep
Artificial turf gives you a consistent playing surface, but it needs regular care to stay in top shape. Brush the turf every week to keep the fibers upright and the surface even. Use a stiff broom or a mechanical brush for best results. Remove any weeds or moss that might appear, especially around the edges. Check the sand or rubber infill and top it up if you notice bare spots.
Callout: A well-maintained turf means better ball bounce and fewer injuries.
Turf Maintenance Tips:
- Brush the turf weekly to keep fibers upright
- Remove debris, weeds, and moss promptly
- Check and refill sand or rubber infill as needed
- Wash the turf with mild detergent to prevent mold
Regular turf care not only improves play but also extends the life of your court. If you notice any damage, fix it quickly to avoid bigger repairs later.
Concept: Artificial Turf vs. Natural Grass
Artificial turf stays green and even all year. You spend less time on maintenance and more time enjoying the game.
Lighting Maintenance
Keeping your court lights in top shape means you get bright, safe play every night. You want your lighting system to last for years, so regular care is key. Let’s walk through what you need to do to keep those LEDs shining.
Concept: Why Lighting Maintenance Matters
Good lighting helps players see the ball and move safely. If your lights flicker or dim, games get harder and accidents can happen. Routine checks keep your court ready for action and save you money on repairs.
Routine Tasks for Lighting Systems
You don’t need fancy tools to keep your lights working well. Just a little attention goes a long way. Here’s what you should do:
- Wipe down fixtures to remove dust, dirt, and cobwebs.
- Check for loose wires or damaged cables.
- Inspect heat sinks and make sure they’re clear of debris.
- Tighten screws and connections so nothing rattles or falls.
- Lubricate moving parts if your system has adjustable mounts.
- Replace bulbs or LED modules that look dim or flicker.
Tip: Set a reminder to check your lights every month. Regular cleaning and inspection prevent bigger problems later.
Comparison: LED vs. Traditional Lighting
LED lights need less maintenance than old-style bulbs. They last longer and use less energy. You spend less time changing bulbs and more time enjoying the game. If you use LEDs, you’ll notice fewer dark spots and better color on the court.
| Feature | LED Lighting | Traditional Lighting |
|---|---|---|
| Lifespan | 50,000+ hours | 5,000–10,000 hours |
| Energy Use | Low | Higher |
| Maintenance | Minimal | Frequent bulb changes |
| Light Quality | Even, bright | Can be uneven |
Concept: Preventive Care for Longevity
You want your lighting system to last as long as possible. Preventive care helps you avoid costly repairs. When you clean and inspect your lights, you catch small issues before they grow. Tight connections and clean fixtures mean your court stays bright and safe.
Troubleshooting Common Issues
Sometimes, you’ll spot problems like flickering lights or uneven brightness. If you see these signs, check the wiring and connections first. Replace any faulty bulbs or modules. If you notice water inside a fixture, dry it out and seal the housing. Always use waterproof cables and covers for outdoor courts.
Note: If you’re not sure about electrical work, call a licensed electrician. Safety comes first.
Quick Lighting Maintenance Checklist
- Clean fixtures and lenses
- Inspect wiring and heat sinks
- Tighten all connections
- Lubricate moving parts
- Replace faulty bulbs or modules
🛠️ Regular lighting care keeps your court looking professional and ready for play. When you stay on top of maintenance, you get better games and happier players.
You now know the key steps to build a Panoramic Padel Court, from planning and choosing top materials to careful installation and regular maintenance. Using a premium solution like the RR01 gives you lasting durability, safety, and a stunning look. Check out the table below to see how quality materials make a difference:
| Aspect | Benefit |
|---|---|
| Durability | Ultra-clear tempered glass, pro-grade turf |
| Safety | Explosion-proof glass, stable steel mesh |
| Aesthetics | High transparency, modern design |
| Lighting | High-efficiency, weatherproof LED fixtures |
If you follow this guide and get expert help for tricky steps, your court will last longer and need fewer repairs. Ready to create a court that stands out? Start your project today!
FAQ
How long does it take to build a panoramic padel court?
Most projects take 4 to 8 weeks from start to finish. Weather, permits, and material delivery can affect your timeline. Planning ahead helps you avoid delays.
What is the best surface for a panoramic padel court?
Artificial turf works best. It gives you consistent bounce, great grip, and low maintenance. You get a professional feel in all seasons.
Can I install a panoramic padel court indoors?
Yes, you can build one indoors. Make sure your ceiling is at least 8 meters high. Good ventilation and lighting are important for indoor play.
How do I maintain the glass panels?
Clean the glass with a soft cloth and glass-safe cleaner. Check for chips or loose fittings every month. Avoid harsh chemicals or abrasive pads.
What permits do I need to build a panoramic padel court?
You usually need building permits and zoning approval. Some areas require noise or lighting permits. Always check with your local authorities before you start.
How much space do I need around the court?
Leave at least 1.5 meters around each side for safe movement. More space makes access easier and improves the playing experience.
Can I customize the color and branding of my court?
Absolutely! Many suppliers let you choose colors and add your logo. Customization helps your court stand out and match your club’s style.
What is the average cost to build a panoramic padel court?
Costs range from €17,500 to €91,200. The price depends on materials, location, and extra features like lighting or branding.